Natural Stone Fabrication Process for Hotel and Retail Projects: 15 Key Steps
The natural stone fabrication process for a luxury hotel or retail project is more complex than cutting standard tiles from a stock slab. Reception counters, feature walls, bathroom vanities, lift surrounds, flooring panels and custom furniture often require different thicknesses, finishes, edge details and installation sequences.
Each finished component must also maintain an appropriate visual relationship with the surrounding pieces. A technically accurate panel can still create problems if the vein direction is reversed, the colour range is inconsistent or the piece number does not match the installation drawing.
This guide explains how the natural stone fabrication process moves from drawings and slab selection to digital scanning, cutting, CNC or waterjet fabrication, dry-lay inspection, quality control and export packing. Buyers can also review Show Stone’s broader range of natural stone materials for hotel, retail, residential and commercial interiors.
Why the Natural Stone Fabrication Process Requires Early Planning
Natural stone fabrication should begin before the first slab reaches the cutting machine. Early decisions about materials, drawings, joints, finishes and installation conditions influence every later production step.
A hotel or retail project may involve:
- Large-format floor and wall panels
- Book-matched feature walls
- Reception counters with mitred edges
- Bathroom vanity tops and splashbacks
- Lift-lobby cladding
- Retail display tables and plinths
- Waterjet floor patterns
- CNC-carved decorative panels
- Fireplace surrounds
- Custom columns and architectural details
These components cannot be managed effectively through cutting dimensions alone. The fabricator also needs to understand the intended appearance, visible faces, installation sequence, support structure and tolerance requirements.
Natural Stone Fabrication Process Overview
| Step | Main Task | Project Purpose |
|---|---|---|
| 1 | Drawing and specification review | Identify dimensions, finishes, joints, edges and installation conditions. |
| 2 | Material and slab approval | Confirm colour range, veining, usable area and batch consistency. |
| 3 | Slab scanning | Create a digital record of the actual slab appearance. |
| 4 | Cutting-layout planning | Position pieces according to vein direction, yield and visible areas. |
| 5 | Primary cutting | Produce panels and components from approved layouts. |
| 6 | Waterjet cutting | Create mosaics, inlays, curves and precise internal shapes. |
| 7 | CNC fabrication | Produce profiles, sink openings, grooves, carving and custom forms. |
| 8 | Edge and mitre processing | Prepare visible edges, joints and built-up details. |
| 9 | Surface finishing | Achieve the approved polished, honed or textured appearance. |
| 10 | Reinforcement and repair | Support sensitive areas and complete approved repairs. |
| 11 | Dry-lay inspection | Review pattern, colour transitions, joints and installation sequence. |
| 12 | Dimensional quality control | Check sizes, thicknesses, openings, edges and tolerances. |
| 13 | Piece numbering | Connect each component with its drawing and installation area. |
| 14 | Protective packing | Protect finished faces, edges and fragile components. |
| 15 | Shipment coordination | Align packing lists, crates and delivery sequence with the project programme. |
Step 1: Review Drawings and Project Specifications
The first stage of the natural stone fabrication process is reviewing the architectural drawings, shop drawings and material schedule. This review should take place before final slab allocation.
The factory needs to confirm:
- Finished component dimensions
- Stone thickness
- Surface finish
- Visible and concealed faces
- Edge profiles
- Mitred or laminated details
- Cut-out dimensions
- Joint locations
- Vein direction
- Installation references
- Required tolerances
- Quantity and spare-material requirements
Drawings should also identify whether dimensions are finished sizes or material-cutting sizes. Unclear allowances for joints, adhesives, support frames or site trimming can create dimensional conflicts later.
Step 2: Select and Approve the Actual Stone Slabs
A small sample can confirm the general stone type, but hotel and retail projects should normally review the actual slabs before fabrication. Full slabs reveal the complete colour, vein movement, natural fissures, mineral areas and usable cutting dimensions.
Materials such as Taj Mahal Quartzite may show meaningful differences in warmth and vein density between batches. Strongly patterned materials such as Breccia Violetta Marble require even more careful slab allocation because each cutting position influences the finished composition.
Projects involving white stone can also benefit from controlled shade ranges. For example, Volakas Marble slabs can be separated according to background tone and vein intensity before they are allocated to repeated hotel bathrooms or wall elevations.
For a detailed explanation of slab approval, batch coordination and matching, review the guide on how to select natural stone slabs for large projects.
Step 3: Digital Slab Scanning and Image Recording
Digital slab scanning creates a scaled visual record of the actual material. The image can then be connected with project drawings during layout planning.
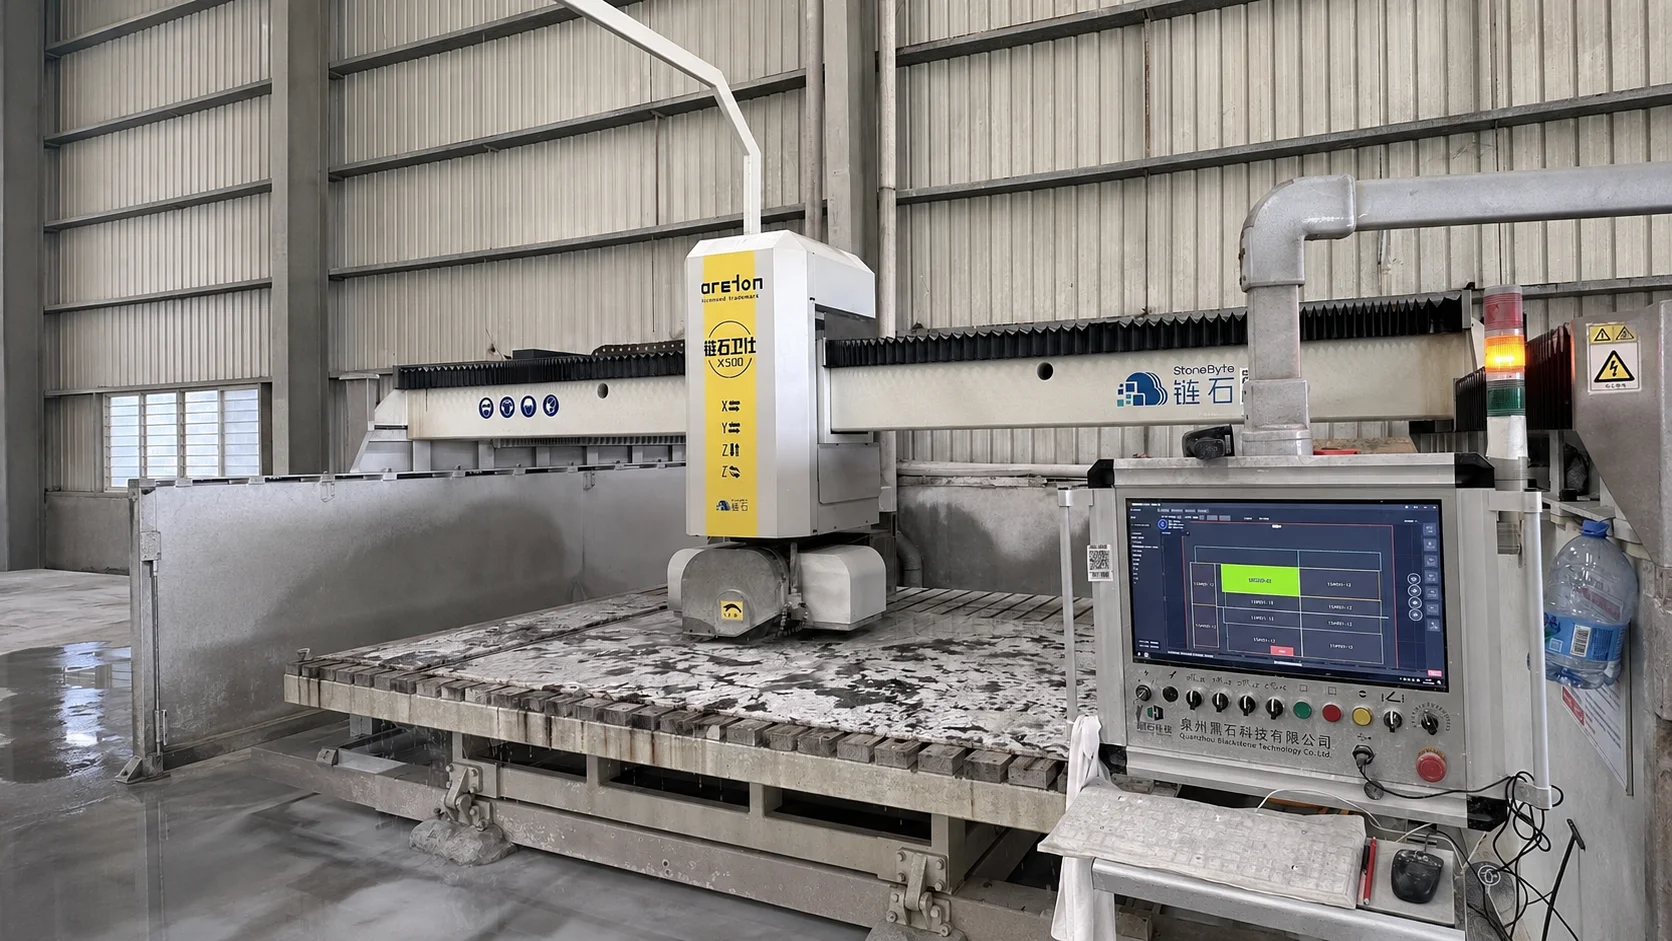
Scanning is particularly useful for materials with strong visual movement, translucent areas or concentrated crystalline zones. Examples include Patagonia Quartzite, Verde Lapponia Marble and Onice Rosa Onyx.
A consistent digital record also helps the factory retain information about:
- Slab number
- Bundle or block reference
- Slab dimensions
- Visible natural features
- Approved cutting zones
- Project allocation
Step 4: Prepare the Digital Cutting Layout
The cutting layout places finished components onto the scanned image of the actual slab. This step links project dimensions with the visual characteristics of the stone.
A layout may define:
- Which slab supplies each component
- Vein direction
- Panel orientation
- Book-matched pairs
- Waterfall connections
- Countertop and backsplash relationships
- Sink and tap openings
- Areas reserved for visible faces
- Natural sections to avoid
- Expected cutting waste
Digital approval is especially valuable for reception counters and retail furniture because a small movement in component position can change the balance of the finished piece.
Show Stone combines slab selection, layout planning and custom fabrication through its natural stone project solutions.
Step 5: Primary Cutting With Bridge and Infrared Equipment
After layout approval, slabs are moved to the primary cutting stage. Bridge cutters and infrared cutting machines produce the main rectangular panels, countertops and wall components.
During this stage, the operator must follow the approved orientation and maintain clear slab and component references. Rotating a directional piece for cutting convenience may interfere with an approved vein relationship.
Primary cutting should consider:
- Blade width and cutting allowance
- Material support
- Natural fissure locations
- Panel dimensions
- Edge-processing allowance
- Visible-face direction
- Piece identification
Five-axis bridge cutting equipment can also support mitred cuts, angled processing and more complex three-dimensional components where appropriate.
Step 6: Waterjet Cutting for Inlays, Mosaics and Complex Shapes
Waterjet cutting is used when a project requires curves, internal corners, decorative patterns or accurate combinations of different materials.
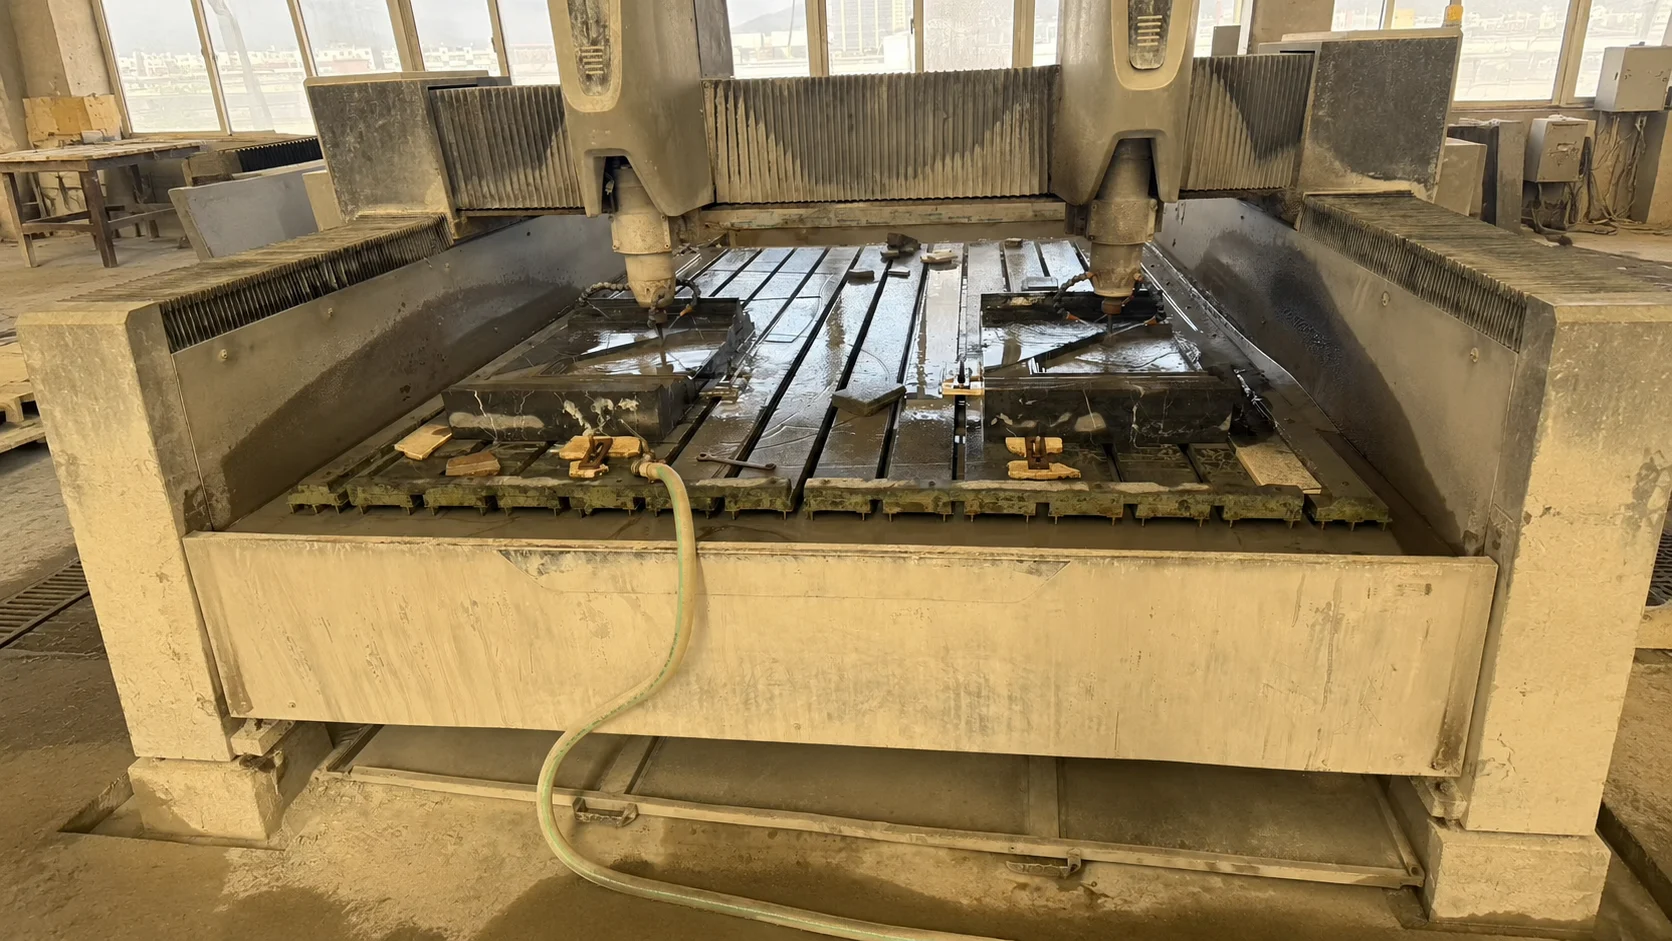
Typical waterjet applications include:
- Lobby medallions
- Geometric marble floors
- Hotel entrance patterns
- Retail logos
- Brass and stone inlays
- Curved wall panels
- Custom mosaics
- Decorative border pieces
Before cutting, the factory should confirm the source drawing, joint width, pattern scale, material thickness and installation backing. Multi-material patterns must also account for possible differences in hardness and surface finishing behaviour.
Step 7: CNC Fabrication for Custom Stone Shapes
CNC machinery supports components that require shaped profiles, accurate openings, grooves, recessed details or carved surfaces.
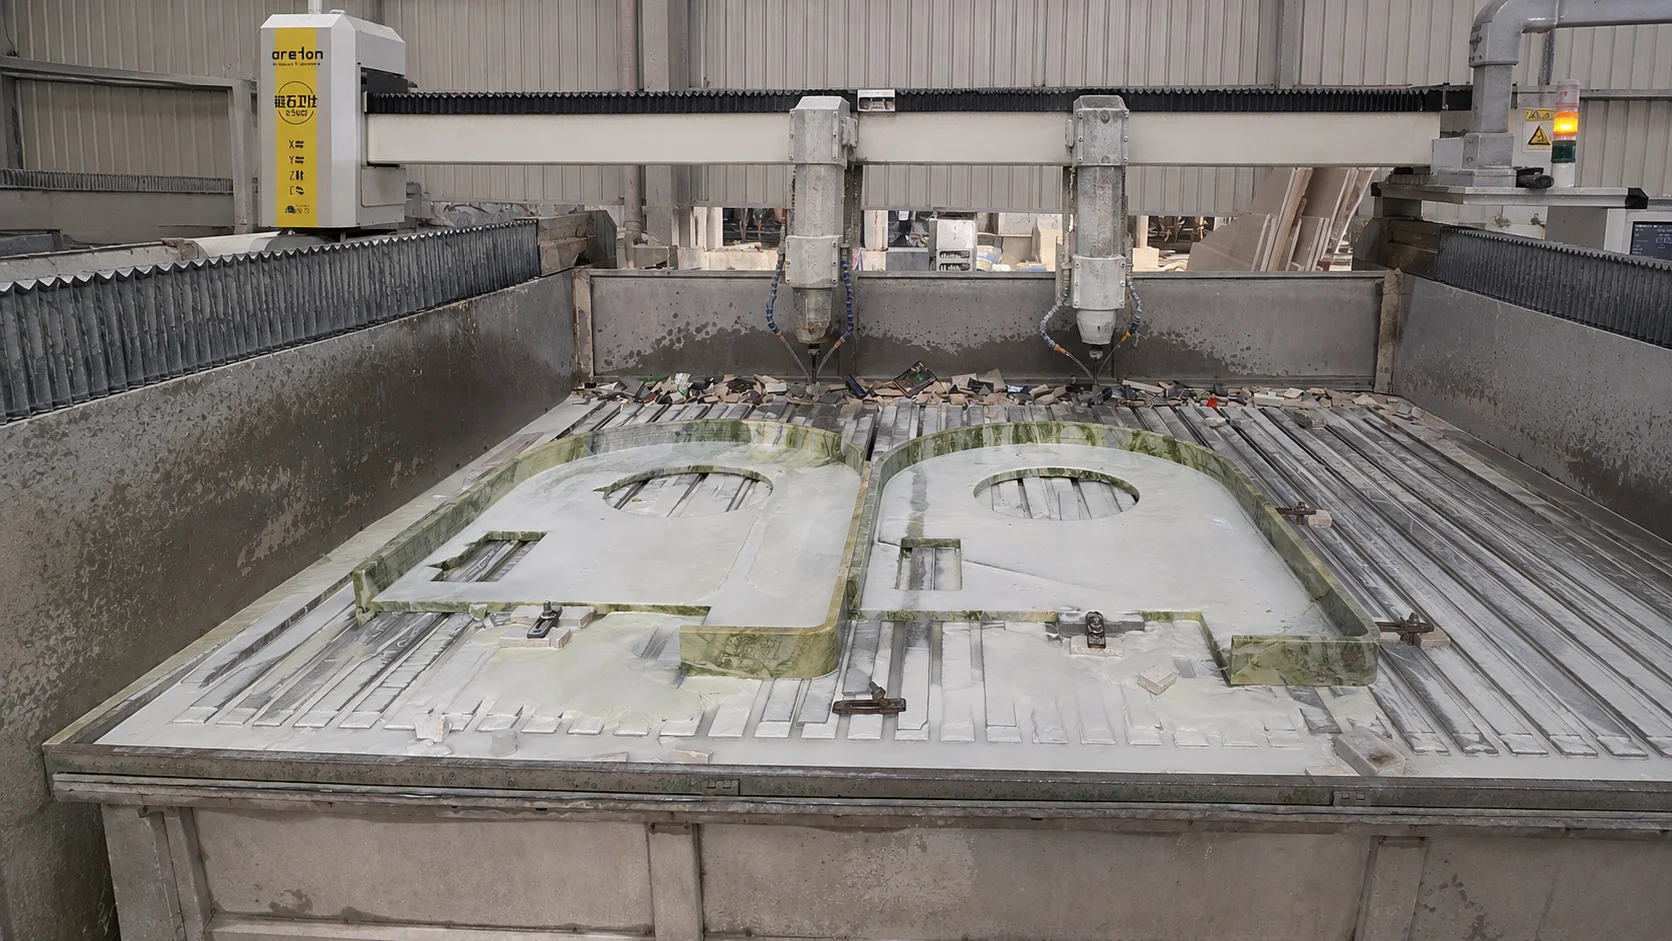
CNC fabrication may be used for:
- Vanity-basin openings
- Kitchen-sink cut-outs
- Tap and service openings
- Drainage grooves
- Fluted panels
- Carved logos
- Decorative wall reliefs
- Curved furniture components
- Column elements
- Custom fireplace details
The digital file must correspond with the approved shop drawing. Even when machine cutting is accurate, the production team should verify the finished dimensions and visible surface after processing.
Step 8: Edge Profiles, Mitres and Built-Up Details
Visible edges influence the final quality of reception counters, vanity tops, bar counters and display furniture. The selected detail should suit the stone thickness, component size and support system.
Common options include:
- Flat polished edges
- Small bevels
- Chamfered edges
- Bullnose profiles
- Mitred edges
- Laminated built-up edges
- Waterfall connections
- Shadow-gap details
Mitred pieces should be dry assembled where practical to confirm the joint, visible thickness and vein relationship. Large cantilevered areas also require suitable structural support rather than relying only on the stone edge.
Step 9: Surface Finishing
The approved surface finish must be maintained across all connected components. Polished, honed and textured finishes reflect light differently, so even the same stone may appear lighter or darker after processing.
Surface control should consider:
- Gloss consistency
- Honed-finish uniformity
- Tool marks
- Edge-to-face transitions
- Repair visibility
- Slip-resistance requirements
- Cleaning and maintenance expectations
Hotel floors, bathrooms and spa areas may require different finishes from wall panels and reception furniture. Designers can compare application options in the guide to the best natural stones for luxury hotel interiors.
Step 10: Reinforcement and Approved Repairs
Some natural stones contain fissures, crystalline areas or delicate sections that require reinforcement. Depending on the component and material, the factory may use mesh backing, resin, rods or local reinforcement.
Reinforcement should support the stone without interfering with the installation system. It is particularly important around:
- Sink openings
- Cooktop openings
- Narrow countertop rails
- Long wall panels
- Onyx sections
- Crystalline quartzite areas
- Large mitred components
Repairs should be assessed according to the approved quality standard and the visibility of the finished location. Natural features should not automatically be treated as defects, but their location and structural condition must be reviewed.
Step 11: Dry-Lay Inspection
Dry laying means arranging finished pieces in their planned relationship before packing. It is one of the most useful quality-control stages in the natural stone fabrication process.
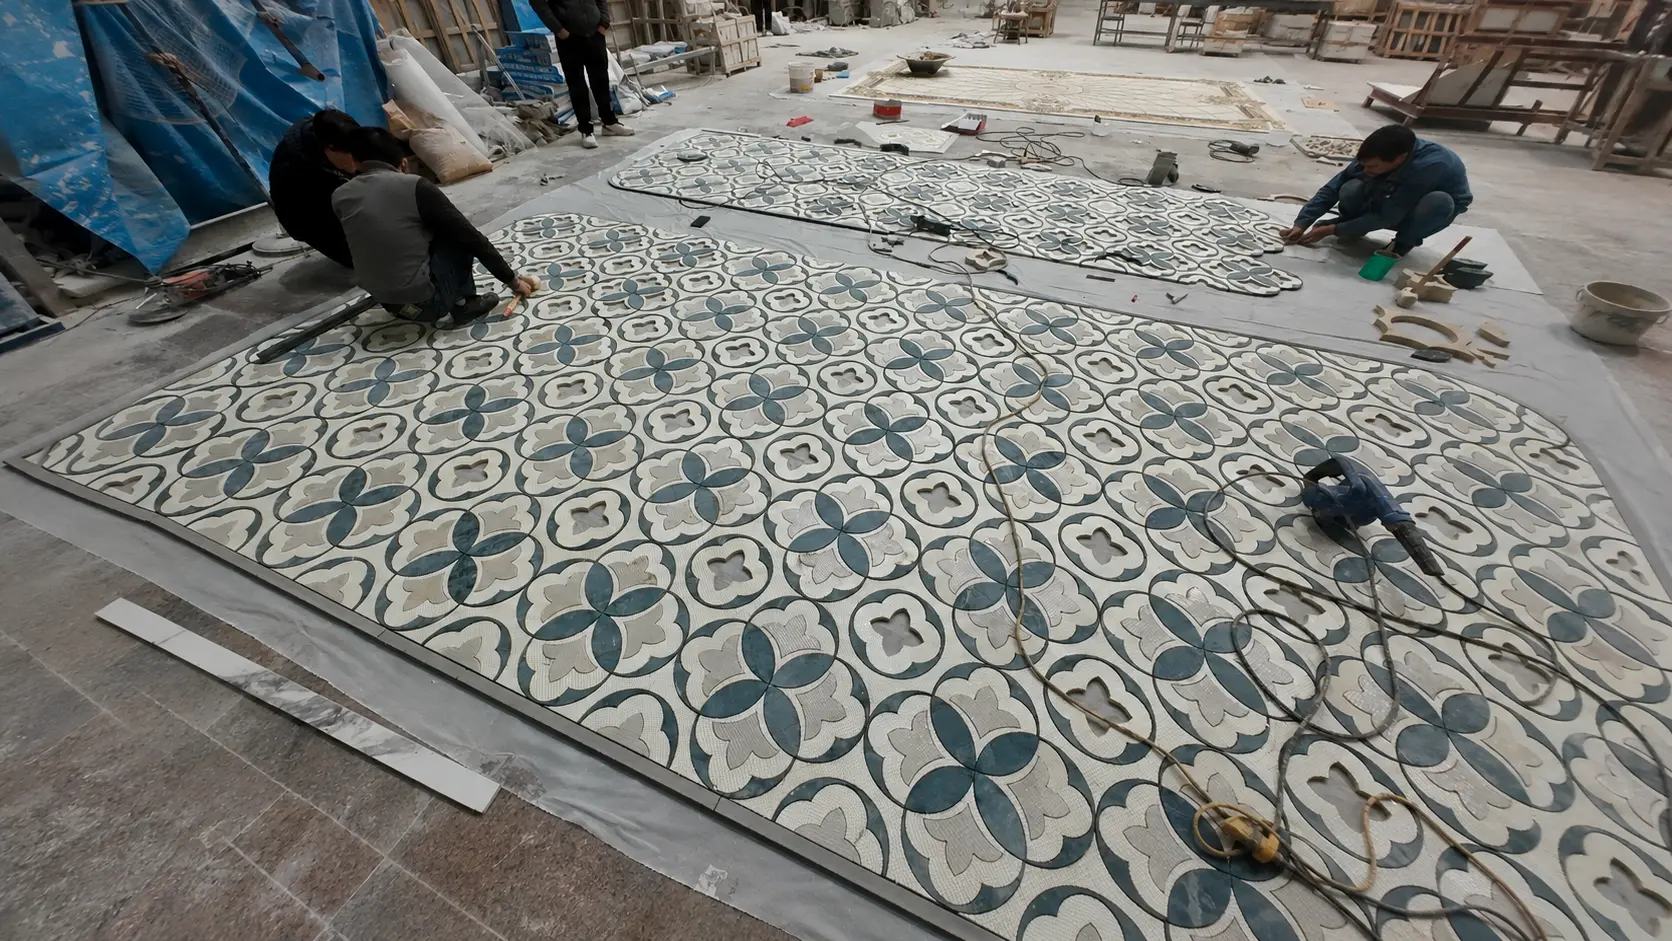
Dry-lay inspection can be applied to:
- Book-matched walls
- Reception counters
- Lobby floors
- Custom mosaics
- Retail display furniture
- Lift surrounds
- Bathroom wall elevations
- Fireplace surrounds
During the review, pieces can be repositioned where permitted to improve the colour transition or visual flow. Photographs and videos can then be supplied for remote project approval.
Step 12: Dimensional and Visual Quality Control
Quality control should compare the finished pieces with approved drawings, sample standards and project requirements.
Typical checks include:
- Length and width
- Thickness
- Diagonal accuracy
- Cut-out dimensions
- Hole positions
- Edge profiles
- Mitred joints
- Surface finish
- Visible repairs
- Vein direction
- Dry-lay sequence
- Piece numbers
Inspection records should be retained with drawings and packing information. This gives the project team a clearer reference if questions arise during site installation.
For independent technical guidance on natural stone tolerances, testing methods and industry standards, project teams can consult the Natural Stone Institute technical bulletins.
Step 13: Piece Numbering and Drawing Coordination
Every finished component should connect with its installation location. Numbering systems may identify the building, floor, room, elevation, furniture item and panel sequence.
A project code could include:
- Tower or building reference
- Floor number
- Room number
- Area reference
- Elevation
- Component type
- Panel sequence
- Visible-face direction
Piece numbers should appear on the component label, shop drawing and packing list. This reduces the risk of similar-looking pieces being installed in the wrong location.
Step 14: Export Wooden-Crate Packing
Finished natural stone requires protective packing that suits the component dimensions, stone type, edge details and shipping method.
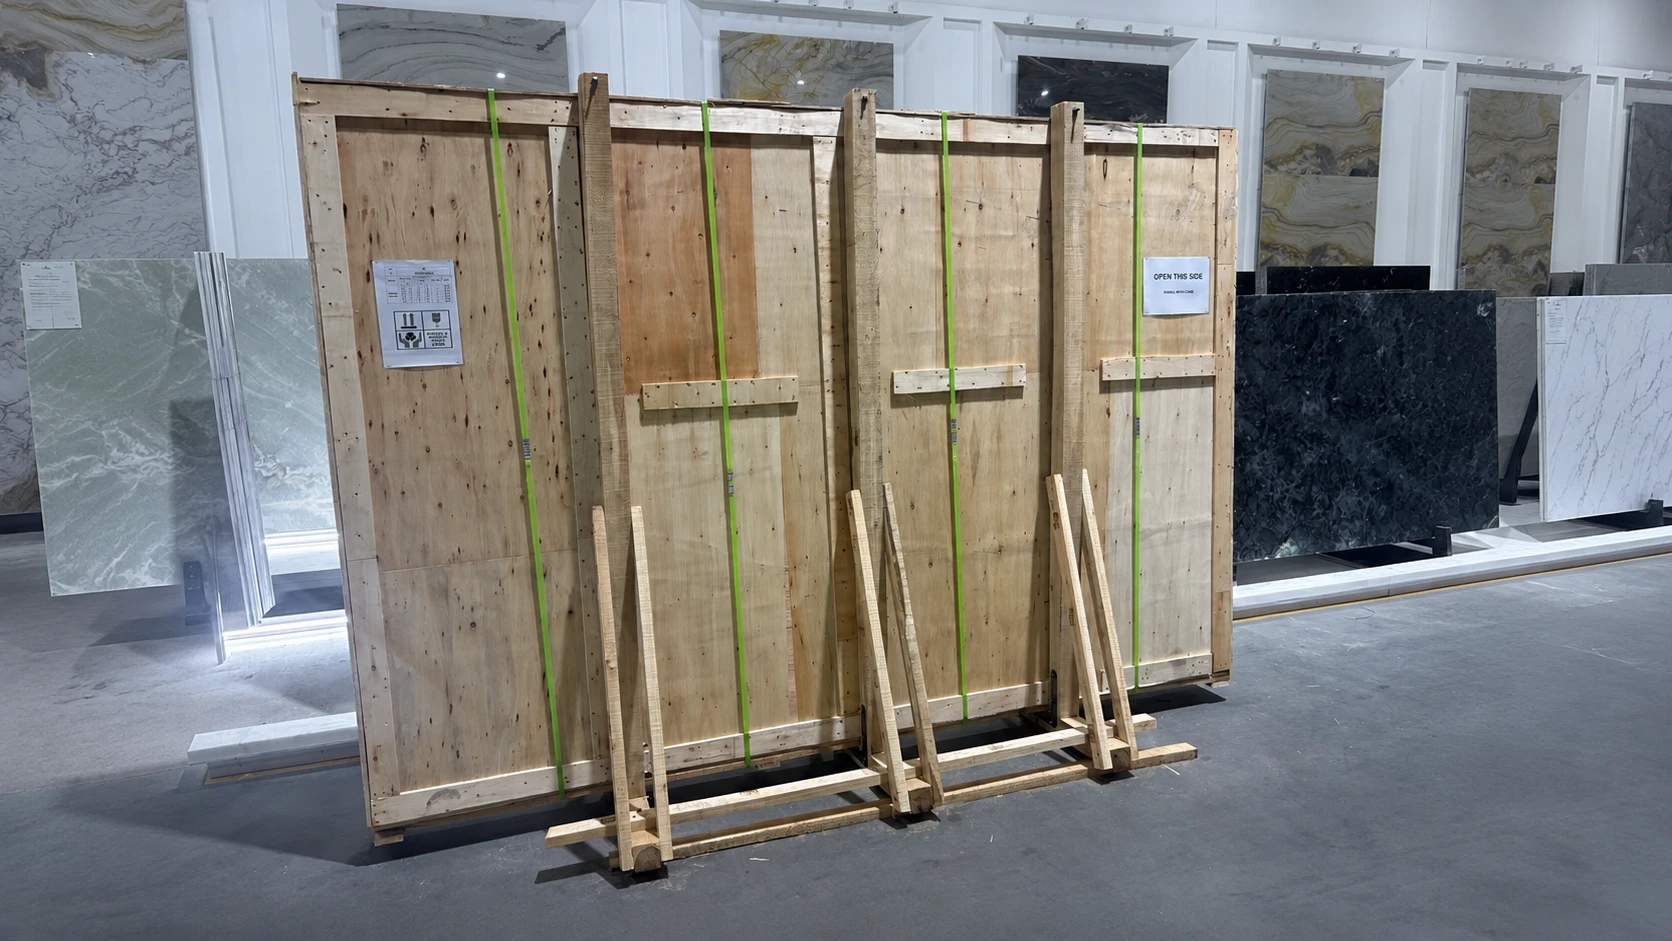
Packing may include:
- Export wooden crates
- Internal timber supports
- Foam protection
- Edge protectors
- Face-to-face separation
- Water-resistant wrapping
- Crate identification
- Installation-zone labels
- Packing lists
Fragile onyx, long panels, mitred countertops and carved components may require additional internal reinforcement. Packing should prevent movement inside the crate while avoiding excessive pressure on sensitive edges.
Step 15: Shipment and Installation-Sequence Coordination
Shipping should be planned around the construction programme and installation sequence. Crates for the same room, floor or retail area should be grouped where practical.
Installation-sequence coordination can reduce:
- Unnecessary crate opening
- Site handling
- Storage confusion
- Mixing between project areas
- Delays caused by missing pieces
Before dispatch, the supplier and buyer should confirm the packing list, crate count, gross weight, shipping marks, delivery terms and destination requirements.
How Fabrication Requirements Change by Project Type
Luxury Hotel Projects
Hotels often combine repeated room components with highly customised public areas. Guestroom vanity tops may require controlled repetition, while lobbies and reception counters may require individual slab layouts and dry-lay approval.
Luxury Retail Projects
Retail projects frequently involve precise furniture components, branded colour palettes, metal inlays, curved details and short installation programmes. Accurate numbering and packaging are therefore especially important.
Premium Residential Projects
High-end residences may include large kitchen islands, full-height backsplashes, fireplaces, bathroom walls and custom furniture. Vein relationships are often reviewed closely because the components are viewed at short distances.
Commercial Interior Projects
Commercial projects may prioritise repeatable dimensions, practical finishes and efficient installation. Batch coordination and spare-material planning remain important when large areas must be maintained over time.
Buyers can explore the natural marble collection and natural quartzite collection when planning materials for these project types.
Common Natural Stone Fabrication Mistakes
Approving Production Before Reviewing Actual Slabs
Small samples do not show complete vein movement, usable area or variation between slabs. Actual material should be approved before final cutting layouts are prepared.
Using Unclear or Incomplete Drawings
Missing joint allowances, edge details or visible-face information can result in technically accurate pieces that do not fit the intended design.
Ignoring Vein Direction During Cutting
Directional stone can look disconnected when adjacent panels are rotated inconsistently. Vein direction should be marked in the drawings and cutting layouts.
Calculating Material From Finished Area Alone
Finished square metres do not include matching loss, edge-processing allowance, cut-outs, defect avoidance or spare pieces.
Skipping Dry-Lay Approval
Unexpected colour transitions or pattern issues are more difficult to correct after the pieces have been packed and shipped.
Using Generic Piece Numbers
Simple sequential numbering may be insufficient for projects with multiple rooms, floors and elevations. Labels should correspond with installation drawings.
Packing by Size Instead of Installation Area
Combining unrelated project zones in the same crate may increase site handling and create installation confusion.
Buyer Checklist Before Ordering
Before starting the natural stone fabrication process, buyers should confirm the project information, approved materials, fabrication details, quality standards and delivery requirements.
- Drawings: Provide current architectural or shop drawings with clear dimensions.
- Applications: Identify floors, walls, counters, furniture and wet areas.
- Material: Confirm the selected stone, batch and acceptable colour range.
- Slab Approval: Review actual slab photographs, videos or digital scans.
- Thickness: Confirm the required finished thickness for each component.
- Finish: Approve polished, honed or textured surface requirements.
- Vein Direction: Mark the intended orientation on drawings or layouts.
- Edges: Confirm mitres, bevels, laminated edges and visible profiles.
- Cut-Outs: Provide templates or approved dimensions for fixtures and equipment.
- Matching: Identify book-match, vein-match and waterfall requirements.
- Dry Lay: Confirm which areas require factory arrangement and approval.
- QC Standards: Define dimensional tolerances and visible-quality expectations.
- Numbering: Connect every piece with its room, floor, elevation or furniture code.
- Packaging: Confirm installation-sequence and crate-marking requirements.
- Schedule: Align drawing approval, production, inspection and shipping dates.
Frequently Asked Questions
What is included in the natural stone fabrication process?
The process normally includes drawing review, slab approval, digital scanning, cutting-layout planning, primary cutting, waterjet or CNC processing, edge finishing, dry-lay inspection, quality control, piece numbering, packing and shipment coordination.
Why are actual slab images required before fabrication?
Actual slab images show complete veining, colour variation, natural features and usable dimensions. They allow the project team to approve the material and plan visible components before cutting.
What is a digital stone cutting layout?
A digital stone cutting layout positions project components on an image of the actual slab. It helps control vein direction, seams, matching relationships, visible areas and cutting yield.
When is waterjet cutting used for natural stone?
Waterjet cutting is commonly used for curves, mosaics, inlays, logos, internal corners and decorative patterns involving one or more materials.
What can CNC stone machines produce?
CNC machines can produce sink openings, grooves, profiles, fluted surfaces, carved details, curved components and other custom architectural shapes.
Why is dry-lay inspection important?
Dry-lay inspection allows finished pieces to be reviewed together before shipment. It helps confirm pattern alignment, colour transitions, joints, dimensions and installation sequence.
How are fabricated stone pieces identified?
Each piece should be numbered according to the approved drawing and may include the building, floor, room, elevation, area and panel sequence.
How should fabricated natural stone be packed?
Fabricated pieces should be protected with suitable wooden crates, internal supports, foam, edge protection, labels and packing lists based on the component type and shipping method.
How much extra material is needed for fabrication?
The allowance depends on component dimensions, cutting yield, vein matching, natural structure, edge details, breakage risk and spare-material requirements. It should be calculated from actual slabs and cutting layouts.
What information should a buyer provide before production?
The buyer should provide drawings, quantities, material requirements, finishes, thicknesses, edge details, cut-outs, matching instructions, quality standards, delivery schedule and destination information.
Why Hotel and Retail Buyers Choose Show Stone
Show Stone supports global architects, designers, contractors, importers and project procurement teams with material sourcing, slab selection, fabrication, quality inspection, packing and international delivery.
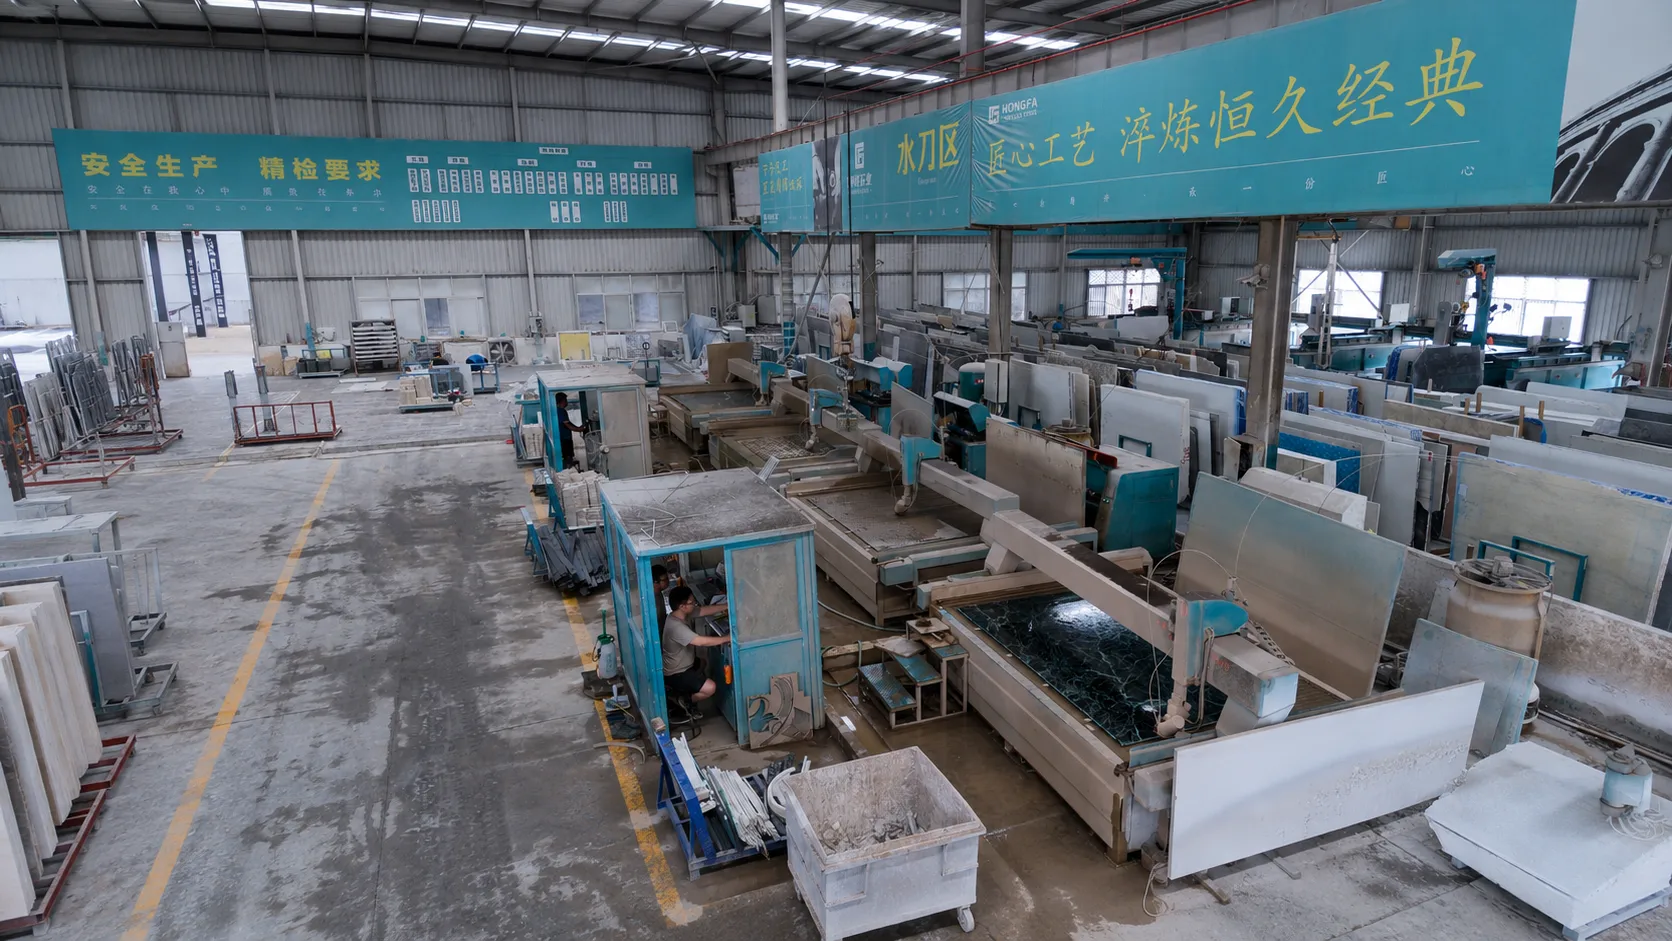
Our approximately 10,000-square-metre finishing centre includes an intelligent slab scanner, a five-axis bridge cutter, eight infrared cutters, four waterjet machines and four CNC carving machines.
These capabilities allow our team to coordinate:
- Full-slab photography and video approval
- Batch and colour-range selection
- Digital slab scanning
- Cutting-layout preparation
- Material-yield assessment
- Vein matching and book matching
- Five-axis and infrared cutting
- Waterjet inlays and mosaics
- CNC carving and custom profiles
- Edge and mitre processing
- Factory dry-lay inspection
- Dimensional and surface-quality control
- Room, floor and elevation numbering
- Installation-sequence packing
- Export wooden crates
- Global shipment coordination
More information about the company and production capabilities is available on the About Show Stone page. Buyers can also review additional material and project guides in the Show Stone blog.
Final Recommendation
A controlled natural stone fabrication process should connect material selection, project drawings, digital layouts, machining, quality inspection and site installation requirements. Treating these activities as separate stages can create avoidable differences in colour, vein direction, dimensions and piece sequence.
For hotel and retail projects, the most effective approach is to approve actual slabs, confirm the drawings, plan the component positions digitally and inspect visible areas before packing. Clear numbering and installation-sequence packaging then help transfer the approved factory arrangement to the project site.
To discuss a hotel, luxury retail, residential or commercial stone package, please contact Show Stone with your drawings, quantities, material preferences, finishes, project schedule and delivery destination.